Google's Android operating system needs no introduction. Every six months, Google updates the operating system to meet latest standards, for utmost performance. Google, in a move to surprise everyone, launched the Android P developer preview a week earlier. The developer preview build gives users and developers first look. You can check out the more detailed features in our other post.
Also Read: Google rolls out Android P Developer Preview: Here's whats new
If you are a developer or an enthusiast looking at trying out the Android P, don't sweat. We have a way for you to do it. However, the Android P developer build is currently available for the Google Pixel, Pixel XL, Pixel 2, Pixel 2 XL. If you have one of these devices, you can install Android P developer build on your device.

Disclaimer: We are not responsible for bricked devices, dead SD cards, thermonuclear war, or you getting fired because the alarm app failed. Please do some research on custom ROM flashing and side-loading ROMS. YOU are choosing to make these modifications and any result positive or negative, you will be responsible.
Warning: If you are running any Substratum themes on your device. We strongly recommend you to disable them before taking the Android P developer build update. Those themes were designed for Android 8.0 Oreo and may cause mismatches in the Android P. So disabling them will ensure a smooth update. Also, backup all your data in advance, as your data can be wiped out during the update.
| Device | OTA | Factory Image |
|---|---|---|
| Google Pixel | OPM1.171019.021 –> PPP1 | PPP1 |
| Google Pixel XL | OPM1.171019.021 –> PPP1 | PPP1 |
| Google Pixel 2 | OPM1.171019.021 –> PPP1 | PPP1 |
| Google Pixel 2 XL | OPM1.171019.021 –> PPP1 | PPP1 |
For Non-Rooted Devices via OTA
To update the devices using the OTA images above, you need the latest adb tool. ADB(Android Debug Bridge) comes bundled with the Android SDK Platform-Tools package, which you can download here.
Don't forget to either add adb to your PATH environment variable or change into the directory containing the executable. Also, make sure, you have enabled USB debugging for your device, and it is ready to receive data using ADB. You can learn how to do it from here.
To apply an OTA update image:
- Make sure that there is no pending OTA update, by going to Settings > About phone > System updates, which should say "Your system is up to date".
- Download the appropriate update image for your device.
- Verify the checksum of the image: the OTA mechanism has a built-in validation feature, but verifying will save you some time if the file is incomplete. The last portion of the filename is the first 8 digits of its SHA-256 checksum; the full SHA-256 checksum is also shown next to the download link.
- With the device powered on and USB debugging enabled, execute.
adb reboot recovery
If you're unable to use adb to reboot into recovery, you can do it manually using the key configuration for your device instead. And then select the Recovery option from the bootloader menu. The device is now in recovery mode and an Android logo with red exclamation mark should appear on screen.
- Hold the Power button and press Volume Up once, and a menu will appear. Select the option Apply update from ADB.
- Run the following command.
adb devices
And check that your device shows up with "sideload" next to its name.
- Run the following command.
adb sideload ota_file.zip
Where ota_file.zip is the name of the file you have downloaded and verified
- Once the update finishes, reboot the phone by choosing Reboot system now.
For Non-Rooted Devices via Factory Images
The method is Similar to the method for Rooted Devices via Factory Images, so we will explain that in detail later. You will need the Factory Image File corresponding to your device. you can find the links n the table above. So go ahead and download it now.
For Rooted Devices via Factory Images
If you are using a Rooted device, may it be a Pixel/Pixel XL/Pixel 2/Pixel 2 XL things will be a little tough for you. If you have rooted the device using Magisk, and you haven't in installed TWRP and not modified any /system and /vendor directly devices, you can directly use the OTA images. However, to minimize risks, it's better to use the Factory images.
- Download the latest P Developer Preview factory image from one of the links in the table above.
- Extract the factory image zip file.
- In the folder, you will see several files: a bootloader image, a radio image, and another zip file that contains the system, boot, vendor, and other partitions that will be updated. You will also see a flash-all.bat and a flash-all.sh.

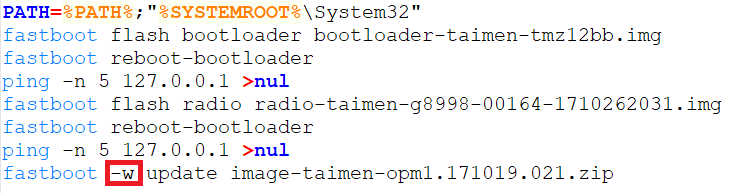
- Windows: Right-click on flash-all.bat and click edit. Find the "fastboot -w update" line. Remove the -w from this line and save the file. This will allow you to flash a factory image without wiping data. If you are running a custom ROM and want to update, then you must leave the -w in the command. I repeat, yo must leave the -w in the commnd.

- Windows: Double-click on flash-all.bat and let it run. It will flash each partition one at a time. This will take a few minutes so let it run.

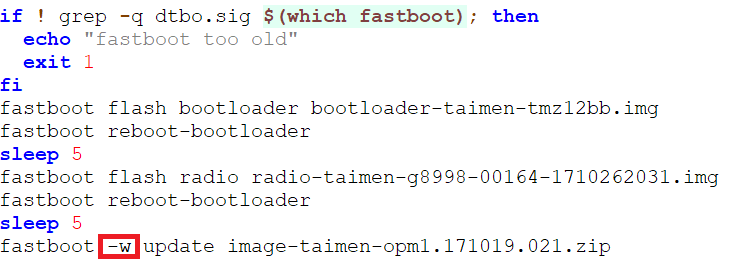
- Mac/Linux: Edit the flash-all.sh script in a text editor and remove the -w from the "fastboot -w update" line. Save the file. This allows you to flash the factory image without losing data. However, if you are running a custom ROM, then you must leave the -w in the command.
- Mac/Linux: Open a terminal in the same directory as the flash-all.sh script, and make it executable by entering chmod +775 flash-all.sh
- Mac/Linux: Run the script by entering ./flash-all.sh in terminal. It’ll take some time as each partition is overwritten, so just let it sit and do its thing.